
Have you ever taken a portrait and thought to yourself... "yuck, my background does NOT look great,"? I know I certainly used to, and so I did some research, and after a bit of practice, learned to create great looking studio backdrops in Photoshop, and after reading this brief guide, you should be able to, too!
Step 1 - Open Photoshop
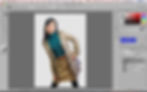
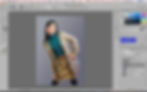
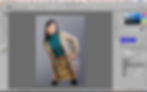
Open your image in Photoshop and do your normal retouching. For this tutorial, I'm going to use a portrait from a shoot I did with my friend, Maggie.

This tutorial is about the background, so for this image I've already done the skin retouching and basic contrast, brightness, etc. It's best if you do these edits before messing with the background.
Now, notice how the backdrop here is a nice gray, but there are wrinkles at the bottom and the colors and lighting aren't very smooth. That's what we're going to fix. First, make a copy of your background layer with Command/Ctrl + J. You want to keep a copy of the original image in case you need to go back to it, but turn that layer's visibility off.
Step 2 - Mask Out Your Foreground
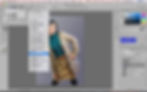
A mask is a tool in Photoshop that allows you to "erase" parts of an image without actually deleting those parts. You basically just turn different parts using on and off using black and white colors as your guidelines (more on that in a moment). Always use masking instead of the eraser tool if you can. It will save you from a lot of headaches. Now then, click on the lasso tool and hold it to select the magnetic lasso tool.

Using this tool, trace the outline of your model. You can also use the regular lasso tool to make finer adjustments. Having a drawing tablet (like the Wacom) helps, but it's not required if you have a steady mouse/trackpad hand.

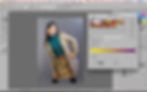
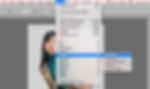
Once your selection is made, you'll want to create your mask by clicking on the "Select and Mask" button at the top.

This will give you a new dialog with options to define how your selection is masked out, with options like feathering, contrast, etc.

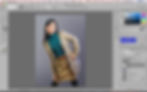
Set your view mode to "On Layers" and as long as your first layer is invisible, your model will now be on a transparent background.

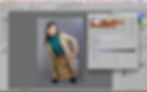
As for the settings, you'll have to play around with it to find out what works best for you, but what generally works for me is Radius 12, Smooth 46, Feather 1.7, Contrast 54%, Shift Edge -6%.
You can check "Remember Settings" to use the same settings for future images. Click OK, and you'll have your new masked layer.
Now, if you like, you can further fine tune your mask by clicking on the mask, and use the brush tool to add or take parts away. Black is to "erase," and white is to bring parts back.

Once you're satisfied with your mask, it's time to work on the background.
Step 3 - Create a Gradient
Now that you have your mask, you can begin work on creating your backdrop. You can create anything you want, but in order to create a realistic backdrop, I try to use the colors and lighting from the original backdrop in a gradient. But first, make sure your color mode is set to RGB and 16 Bits/Channel. RGB is standard, but you'll want to make sure you're working in 16 Bits/Channel mode to ensure the best array of possible colors in your image. 32 Bits/Channel is just overkill and makes your image files too large, so stick to 16.

If you don't do this, you will end up with what is known as "banding," which are jagged lines in your image. This can also happen if you simply smooth out the original backdrop, perhaps with frequency separation. The reason this happens is that 8 Bits/Channel doesn't provide enough colors for a smooth gradient.

Now that you've got your image RGB and 16 Bits/Channel mode, you can create your gradient. First, make a new layer where you'll place your gradient. And then make your original background layer visible. Click on the fill tool and hold it down to select the gradient tool.

Next, click on the gradient and you'll be given a dialog to alter your gradient.
And now, click on the little arrows to change the color of your gradient. Depending on your base gradient, you may have 2 arrows or more, but you can always create more if you want more colors in your gradient, by clicking the empty space below the color bar.
Now, on that new layer you created, click and drag with the gradient tool to create your gradient layer. You'll want to try it a couple of times to get the right angle and spread. You should experiment with the size, direction, and type of gradient until it looks right. Linear and Radial gradients work best.
Now you've got yourself a decent looking background, but it looks a little too perfect, so I would use "Neutral Density" gradients on additional layers, both black and white, to create some additional shadows and highlights.
You will notice some banding at this point, but don't worry. The next step will take care of that.
Step 4 - Texture
This step is very crucial to making sure your background is smooth and realistic. Create a new layer, and use the fill tool to make it completely light gray.

Next, click on Filter and Add Noise to this layer.
Make sure your Noise is set to about 25, gaussian, and monochromatic.

Click OK, and then go to your layer style and change it to Linear Light.

And now, you want to set the opacity of your Noise layer to about 5-15%. It depends on the color of your backdrop, but basically you want to zoom in and have it just high enough so that it makes the banding just about disappear. It will still be there, slightly, but once you merge your background layers it will go away! Select the three layers, your main color gradient, your neutral density gradients, and your noise layer, and press Command/Crtrl E to merge them to a single layer.
And now you've got yourself a nice and even, textured, banding-free background.

Step 5 - Finishing Touches
Once you have your background finished, you'll want to go back to your masked model's layer and make sure there's no stray pieces from your original background. And if your model has stray hairs that show the background, you can simply use brightness/contrast adjustment layers on the hair and adjust it until it blends with the background layer.
Save your image, and voilà!

If you have any questions, or if I missed something, feel free to shoot me an email!